Quick Start
Download
Infrastructure Host
Let’s start with the infrastructure host. This is the machine where the RabbitMQ, MySQL and Redis services will be running. Make sure that docker is installed and configured on that machine and run the following commands to set everything up:
Start Redis
docker run --net="host" -d --name redis -p 6379:6379 redis
Start RabbitMQ
docker run --net="host" -d --name rabbitmq -e RABBITMQ_DEFAULT_USER=visp -e RABBITMQ_DEFAULT_PASS=visp -p 15672:15672 -p 5672:5672 rabbitmq:3-management
Start MariaDB
docker run --net="host" -d --name mysql -e MYSQL_ROOT_PASSWORD=visp -e MYSQL_DATABASE=visp -p 3306:3306 mariadb
Configuration
Before the VISP runtime can be executed, the following configuration is necessary, which can be found in the folder `runtimeConfiguration”:
Credentials
Make a copy of the credential.sample.properties file and name it credential.properties. The following credentials must be specified:
| Property | Value |
|---|---|
| os.auth.url | <URL of OpenStack, e.g. `http://openstack.infosys.tuwien.ac.at/identity/v2.0`> |
| os.tenant.name | <The name of the OpenStack project> |
| os.username | <OpenStack username> |
| os.password | <OpenStack password> |
| os.keypair.name | <Name of an available SSH keypair> |
| spring.datasource.username | root |
| spring.datasource.password | visp |
| spring.rabbitmq.username | visp |
| spring.rabbitmq.password | visp |
The spring credentials for the database and rabbitmq can be kept the same if no changes were made during the container deployment process in the setup of the infrastructure host.
Database IP
Just in case the VISP Runtime is executed on a host different from where the runtime is running, it is possible to specify the database IP manually. This is possible by creating a database.properties file in the application root that contains the IP of the host where the MySQL server is running.
Operator Configuration
In order to configure the resource requirements of the individual operators, it is required to define them in the operatorConfiguration.json file.
Run VISP
The easiest way to run VISP is by using a docker image.
Required Software
Before the build process can be started, the following software must be installed:
- Java 8 (tested with Oracle Java 1.8.0_111)
- Apache Maven (tested with 3.3.9)
Building the Docker Container
In order to generate a docker image for the runtime, use this maven command (important: make sure to correctly set the credentials.properties and application.properties before pushing as described earlier):
docker login
The first command is used to log into your dockerhub account. Then the maven project is built and pushed to the dockerhub repository specified in pom.xml. Change this to your own repository by modifying the pom.xml:
<configuration>
	<repository>{dockerhub-username}/{dockerhub-repository}</repository>
	<tag>latest</tag>
</configuration>
Then you can build the container with the folloging command:
mvn install
Once the image has been successfully built (and optionally pushed to a docker repository, the following command can be used to run a docker container:
docker run --net="host" -d --name vispruntime {dockerhub-username}/{dockerhub-repository}
Running VISP from Source
You can also download the VISP source code and run it directly via Maven. After configuring the two properties files as described above, run the following maven command in the project root:
mvn spring-boot:run
Setup VISP
Creating Resource Pools
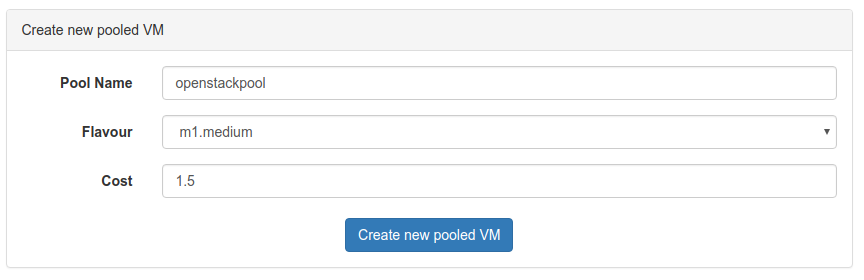
Once the infrastructure host is up and running, a resource pool needs to be created. Resource pools are basically cloud computing instances where docker containers are executed. Open the web interface of the infrastructure host (http://<infrastructureHost>:8080/) and navigate to Resource Pools. Initially, there should be no entries. Create a new pool by clickin on the Add new pooled VM button and specify a name, an instance flavour and a cost. The name is an identifier and is also used in the topology config file to distinguish different pools on the same runtime instance. The flavour reflects the amount of computational resources available and basically limits how many operators can be deployed at the same time. The cost value is currently not used.
Deploy Topology
Topology files are used to describe which processing nodes should be deployed and how they should be connected. In order to upload a topology file, navigate to the web interface of the infrastructure host (http://<infrastructureHoste>:8080/) and select Change Topology. There you can upload a new topology file and see which topology is currently active. If the nodes should be deployed on multiple VISP runtime instances, just upload the topology on one runtime instance - VISP’s distributed update process will take care of the rest and update the other runtime instances accordingly.
Here are two example topology files: scenario1 and scenario2.
Importantly, the IP addresses of the VISP runtimes need to be adjusted. In both cases, the operators are deployed on different runtimes to show how to specify such a behavior. Of course it is also possible to deploy all operators on one single VISP runtime instance (the only limitation is the number and size of resource pools specified).
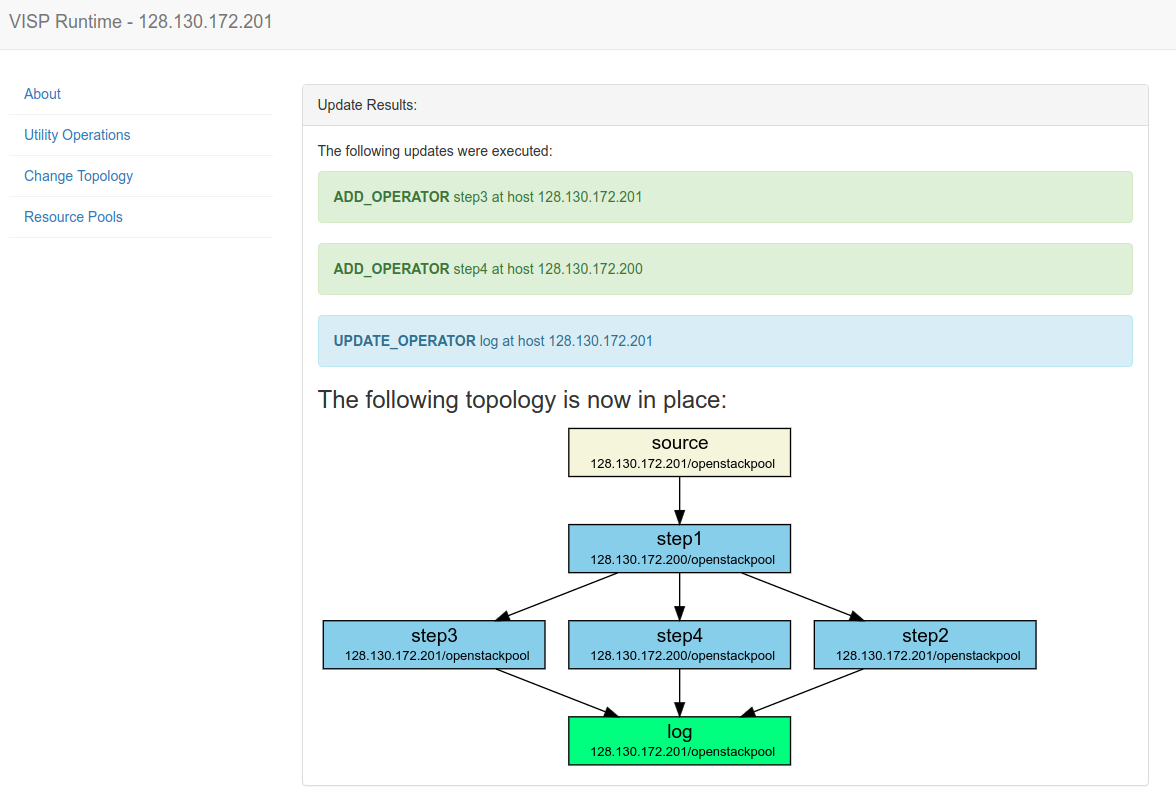
The above figure shows the result of a topology update where six operators (one source, one sink, four processing operators) are deployed on two different VISP runtime instances. The automatically generated graphic shows the runtime instance and resource pool where each operator is deployed.
Testing VISP
In order to evaluate whether the set up topology is actually working properly, we have developed the VISP Data Provider tool. This tool allows automatically generating input data for a configurable VISP runtime instance.
Download
Run Data Provider
The data provider can be executed by running the following maven command
mvn spring-boot:run
Stream Data
Before the data stream can be started, the configuration has to be adapted. Navigate to the VISP Data Provider web interface: http://localhost:8090/
There, enter the public URI of the VISP Runtime where the target source operator is located. E.g., if the source that should be addressed is deployed at a VISP runtime 128.130.172.222, enter that IP.
Username and password are the credentials for the rabbitmq server that were set during the docker deployment of the infrastructure host.
Once the credentials are configured, navigate to Create Task, pick a template (e.g. SequentialWait) and specify the frequency and number of iterations. The template decides which queue is targeted and what kind of data is sent.

Observe the Data Processing
To see whether the generated data is processed correctly, you can open the rabbitmq web interface on the corresponding infrastructure hosts. For example, navigate to http://128.130.172.201:15672/#/queues (replace the IP with the actual infrastructure host).
Each communication link between two operators is represented by a single queue that is named according to the following schema:
128.130.172.201/source>step1
The first part represents the sending operator’s VISP runtime IP. Separated by a slash follows the sending operator’s ID. Finally, a greater than sign precedes the receiving operator’s ID.